
Recall back in Part 2 and the start of Part 3 when we looked at the single green branch:

And we found out it is \(\game{0}{0}\), which we called \(\star\). Let’s look closely at some properties of \(\star\), and meet some of its friends.
First up: What’s \(\star + \star\)? We don’t need to break out the notation for this one, we can just look at Hackenbush branches, like so,

to see that \(\star + \star = 0\), which is… interesting. This means that \(\star\) is its own negative. This intuitively makes sense, as switching all the red and blue branches in a position with only green branches doesn’t change anything. Notationally, you can see that negating \(\impgame{0}\) doesn’t change anything either, as zero is its own negative too.
Let’s look at another set of branches:

What about this one? This, too, is a first player win, since whoever goes first can just cut the bottom branch. That means that unlike our monochrome blue and red stacks, this acts differently from Figure 5.2, which we saw to be zero. What, then, is the value of this position? Is it perhaps \(\star\)? We can solve this with branches too, but let’s look instead at the notation. Since \(\star\) is its own negative, we can check if this game is \(\star\) too by seeing if it makes zero when you add \(\star\) to it.
But what is the notation for this position? Each player has two options, the same two options. They can either chop the bottom branch and go to \(0\), or chop the top one and go to \(\star\). Thus, this position is \(\impgame{0,\star}\).
So, we must check the sum position
\[\impgame{0,\star} + \impgame{0}\]
Which is won by the first player, who can move the left component to \(\star\), leaving the second with \(\star + \star = 0\). Since this isn’t a second player win, \(\impgame{0,\star} \neq \star\).
But wait! In Part 4, we saw how removing dominated options would not change a position! Why isn’t this just \(\impgame{0}\)? Neither player would ever want to move to \(\star\), since moving to \(0\) will let them win the isolated position, right? Well, we just saw in that above example how the first player wins with a move to \(\star\), but we can talk more generally. For one of Lazuli’s options \(A\) to dominate \(B\), \(A\) must be greater than \(B\) (or less, if we’re talking about Ruby’s options). Is \(0\) greater than (or less than) \(\star\)? No! Recall from Part 3, we saw that \(\star\) is confused with \(0\)! It cannot be removed from this position.
This leaves us with a conundrum. We have a new position and it doesn’t equal anything we’ve seen so far. The solution, of course, is to give it a new name. I introduce you to:
\[ \star2 = \impgame{0,\star}\]
Pronounced “star-two”. You’re probably asking yourself if you can form more “star numbers” by adding a \(\star2\) to both sides, and so on, and the answer is yes. However, stacks of green Hackenbush branches will be far too cumbersome, so I must introduce you to the game that needs no introduction:
The Game of Nim
Yup, here we are. You can’t talk about math and games without bringing up Nim eventually. It’s very simple, and as we will soon see, very very powerful.
The rules of the game of Nim are simple. You and your opponent are sat at a table, and that table has several heaps of coins on it. On your turn, you can remove any number of coins from any one heap. As this is a combinatorial game, whoever is left unable to move (when no heaps remain) loses.
Our star numbers show up in Nim a lot, to the point where they are called nimbers.
Since the only thing that’s relevant in a Nim position is the size of each heap, I will notate Nim positions using numbers in green boxes. For example, a position with three heaps of size 3, 1, and 4 would be written as
\[ \textcolor{#34c173}{\boxed{3} \boxed{1} \boxed{4}} \]
I will now define a nimber. Consider the Nim position
\[ \textcolor{#34c173}{\boxed{n}} \]
We will call this position \(\star n\), the \(n\)th nimber. What moves can be taken from this position?
Either player has the same set of moves, to remove any amount of coins from the heap. The effect this has on the position is reducing the heap’s size to anything less than \(n\). So, in our vertical bar notation, we write:
\[ \star n = \impgame{\star0, \star1, \star2, \cdots, \star (n-1)} \]
(Note that \(\star0 = 0\) and \(\star1 = \star\), so we will use those names instead for those two values.)
It is important to note here that all of these nimbers have a special property that numbers we saw in Part 4 did not. Namely, each player always has the same set of options. Such positions are called impartial, and we will show a very important result about impartial positions at the end of this Part. (Positions that are not impartial are called partizan, not to be confused with the word “partisan”).
What is the relationship between these nimbers? How do they compare with eachother? One can play the game of Nim to find out.
Suppose we had the Nim position
\[ \textcolor{#34c173}{\boxed{n}\boxed{m}} \]
Since all nimbers are their own negatives, finding out who wins this position is enough to compare \(\star n\) and \(\star m\). If \(n\) and \(m\) are equal, the position is zero by the Tweedledee and Tweedledum Argument (the second player can just copy the first’s moves on the other heap). If they aren’t equal (let’s say \(n > m\)), the first player can move from \(\star n\) to \(\star m\), leaving the second with \(\star m + \star m = 0\). What this means is that any two different nimbers are confused with each other, and they are all confused with zero.
But what is the value of \(\star n + \star m\)? How can we do arithmetic on these nimbers? There’s actually a very clever method of doing it which might be familiar to the programmers in the audience:
Nimber Arithmetic
The first important property of nimber addition is that \(\star n + \star n = 0\), as we saw above. But what can we say about positions that are not equal to each other?
As it turns out, there’s a nice property that you get when you add some pairs of nimbers together, which is sufficient to discern how any two nimbers act: we need only examine powers of two.
For an example, consider the Nim position
\[ \textcolor{#34c173}{\boxed{1}\boxed{2}\boxed{3}} \]
which is the sum \(\star1 + \star2 + \star3\). The second player can win this position thanks to a clever realization. No matter which heap the first player removes coins in, the second player can always change the position to that of two equal heaps, which is a zero position. If the first player either moves \(\star2 \to \star1\) or \(\star3 \to \star1\), for example, the second can just completely remove whichever heap isn’t a single coin. And since the second player can force a zero position onto the first, they win, and entire position has value
\[\star1 + \star2 + \star3 = 0\]
which, since nimbers are their own negatives, can be rearranged to give us three equations that tell us the sum of two nimbers:
\[\star2 + \star3 = \star1\] \[\star1 + \star3 = \star2\] \[\star1 + \star2 = \star3\]
In that third equation is an interesting property emerges. In this case, adding the nimbers gives you the nimber whose index is the sum of those of the nimbers you added. As it turns out, this holds when you add any pair of nimbers whose indices are powers of two. I invite you to show that some of the positions that reflect sums of bigger powers of two are zero positions, but the strategies get complicated and long for Nim positions this large:
\[ \textcolor{#34c173}{\boxed{1}\boxed{4}\boxed{5}} \] \[ \textcolor{#34c173}{\boxed{2}\boxed{4}\boxed{6}} \] \[ \textcolor{#34c173}{\boxed{2}\boxed{8}\boxed{10}} \]
And, after enough effort (or by reading the following proof), you can convince yourself of the fact that
Proposition: For \(n \neq m\), \(\star(2^n) + \star(2^m) = \star(2^n + 2^m)\)
Proof: By strong induction.
Suppose that, for all \(b\) and \(a\) where \(0 \geq b < a < k\), that \(\star(2^b) + \star(2^a) = \star(2^b + 2^a)\).
Note that this means the sums of any two nimbers up to \(\star(2^k)\) are other nimbers, as you can split apart any nimber into sums of powers of two, cancel pairs, and add the remaining ones together.
We now consider the sum
\[ \star(2^a) + \star(2^k) \]
We will show that this is equal to \(\star(2^a + 2^k)\) by showing that the Nim position
\[ \textcolor{#34c173}{\boxed{2^a}\boxed{2^k}\boxed{2^a + 2^k}} \]
or, in terms of the nimbers, \(\star(2^a) + \star(2^k) + \star(2^a + 2^k)\), is zero by presenting a winning strategy for the second player.
On the first move, the first player has three options:
- If the first player moves \(\star(2^a) \to \star x\) for some \(x\), the second player can move \(\star(2^a + 2^k) \to \star x + \star (2^k)\) (this sum is a nimber \(\star y\) where \(y < k\) by induction, so this is possible)
- If the first player moves \(\star(2^k) \to \star x\) for some \(x\), the second player again moves \(\star(2^a + 2^k) \to \star x + \star (2^a)\) (which is possible by the same reasoning as in Case 1)
- If the first player moves in \(\star(2^a + 2^k) \to \star x\) for some \(x\), the second player is always able to do one of these two moves (note that these are just the first and second cases with the players reversed):
- Move \(\star(2^a) \to \star y\) where \(\star y + \star(2^k) = \star x\)
- Move \(\star(2^k) \to \star y\) where \(\star y + \star(2^a) = \star x\)
Case 1 leaves the first player in a position with value \(\star x + \star(2^k) + (\star x + \star(2^k)) = 0\) Case 2 leaves the first player in a position with value \(\star(2^a) + \star x + (\star x + \star(2^a)) = 0\) Case 3 leaves the first player in the same outcome as either Case 1 or Case 2, depending on which sub-case player 2 is able to take.
In all three cases, the first player is left in a zero position, so they lose, meaning that the original position is zero and \(\star(2^a) + \star(2^k) = \star(2^a + 2^k)\)
\(\blacksquare\)
With that, we can add any pair of nimbers together. The method for doing so leverages the rules for powers of two.
Suppose a cabal of mathematicians jumped you on the side of the road and demanded to know the value of the Nim position
\[ \textcolor{#34c173}{\boxed{104}\boxed{45}} \]
Or, in other words, demanded you find \(\star104 + \star45\). The first step is to rewrite these numbers as sums of powers of two. Remember that we can do this because when the indices of nimbers are powers of two, adding them together just means adding the indices.
\[ \star104 + \star 45 = \star64 + \star32 + \star8 + \star32 + \star8 + \star4 + \star1 \]
Now, we can do some simplification. We can cancel out any nimber with a copy of itself, so the pair of \(\star32\)s and the pair of \(\star8\)s in that sum go away, leaving us with
\[ \star64 + \star4 + \star1 \]
Since this is a sum of nimbers whose indices are powers of two, we can just add the indices, so we have
\[ \star104 + \star45 = \star69 \]
Nice. Now we can add nimbers together. In fact, nimber addition isn’t new and it has a much more common name that the computer scientists might recognize: To add two nimbers, take the bitwise exclusive or (XOR) of their indices.
For a more concise description of how to compute the sum of two nimbers that highlights that this operation is really exclusive or, you can take every \(\star n\), write out its \(n\) in binary, line them up, and then count the columns. If a column has an even number of ones, the final answer will have a \(0\) in that position. If the count is odd, you get a \(1\) in that position.
Excellent. This lets us characterize a lot of impartial positions. However, there’s a type of impartial position involving nimbers that we haven’t learned how to deal with yet. Nimbers have options for all lower nimbers, but what if we skip some? What about a position like \(\impgame{0, \star, \star2, \star4, \star30}\)?
To find out what this position is, we will learn the second way of simplifying positions, which when combined with removing dominated options will allow us to simplify any position, entirely.
Reversible Moves and the Mex Rule
To understand the concept of a reversible move, I will introduce you to a slight variant of Nim, called Poker-Nim. The rules are the same, but each player is allowed to keep any coins they remove from the heap. On their turn, instead of removing coins, the player may create a new heap using as many of their collected coins as they wish, or add to an existing heap.
Surely this new ability allows a lot of new strategy in the game of Poker-Nim, right? As it turns out, not really. Consider the following scenario:
After a long and grueling game of Poker-Nim, you have left your oponent with the position
\[ \textcolor{#34c173}{\boxed{4}\boxed{4}} \]
which is a win for you in traditional Nim. However, your opponent decides to put their accumulated wealth into play, and moves the position to the quite scary
\[ \textcolor{#34c173}{\boxed{4}\boxed{10000000000000000000000000003}} \]
This seems quite annoying to you, until you realize that you can simply take that second heap and reduce it right back to
\[ \textcolor{#34c173}{\boxed{4}\boxed{4}} \]
If your opponent tries to leverage their wealth again, you can simply do it again. And again. And again. Eventually, your opponent will have exhausted their coffers, and must now only make normal Nim moves, at which point your usual Nim strategy can handle it.
While our opponent had the option to move a component to some astronomically remote nimber, we could simply reverse that option and bring the position right back to where it was. This is, in essence, the method of simplification by bypassing reversible moves.
Here is the formal definition of a reversible move:
Consider a general position \(G = \game{A, B, C, \cdots}{D, E, F, \cdots}\)
We say that Ruby’s move to \(D\) is reversible if there exists some \(D^L\) where \(D^L \geq G\). Likewise, we say that Lazuli’s move to \(A\) is reversible if there exists some \(A^R\) where \(A^R \leq G\).
This definition is a bit hard to wrap one’s head around, since it looks “two moves deep” into the position, so it may help to make these levels explicit in the intuitive explanation:
Suppose we start in a position, \(G\). You then decide to move from \(G\) to \(H\). If your opponent has any option from \(H\) that leaves them in a position at least as good for them as \(G\) was, then your move to \(H\) was reversible. If we give that option of the opponent’s a name, \(I\), we say that \(H\) was reversible through \(I\).
Another way to think about reversible moves is that if a player’s move is reversible, their opponent has an “undo button” which can bring the position back to what it was, or they have a “super undo button” which reverts the position to something even better for them.
Now, how do we use this to simplify positions? Your first thought might be that reversible moves can simply be deleted, but that isn’t always the case. Remember, sometimes your opponent has a “super undo button”, leaving the position in a better state for them, and that definitely affects the value. How do we account for this? We cannot simply remove a reversible option, we must replace it with all the new options that exist after the “undo button” is pressed.
Theorem: Consider a position \[G = \game{A, B, C, \cdots}{X, Y, Z, \cdots}\] If \(A\) is reversible through \(H\), then \[G = \game{H^{L}, B, C, \cdots}{X, Y, Z}\] where \(H^{L}\) ranges over all of Lazuli’s options from \(H\). Likewise, if \(X\) is reversible through \(W\), then \[G = \game{A, B, C, \cdots}{W^{R}, Y, Z}\]
Proof:
We show only the case for Lazuli’s reversible move. The argument for Ruby is similar.
Let
\[G = \game{A, B, C, \cdots}{X, Y, Z, \cdots}\] \[G' = \game{H^{L}, B, C, \cdots}{X, Y, Z}\]
And suppose that \(A\) was reversible through \(H\) (meaning \(H \leq G\)). We wish to show that \(G = G'\), which we will do by showing that second player wins their difference,
\[G - G' = \game{A, B, C, \cdots}{X, Y, Z, \cdots} - \game{H^{L}, B, C, \cdots}{X, Y, Z}\]
Every move that the first player makes on one component can be copied by the second player on the other, leaving the position zero, with two exceptions: if Lazuli moves \(G \to A\) or if Ruby moves \(G' \to H^{L}\). We consider each case seperately.
- First, consider if Lazuli moves \(G \to A\). (In this case we need to show that Ruby wins.) Suppose then Ruby moved \(A \to H\), leaving the total position \(H - G'\) with Lazuli to move. There are two possibilities for Lazuli’s moves:
- If Lazuli moves \(H \to H^{L}\), Ruby can move \(G'\) to that same \(H^{L}\), leaving the position zero with Lazuli to move, so Ruby wins.
- If Lazuli moves \(G' \to X\) (or \(Y\), or \(Z\)), the total position is \(H - X\). However, since we know that \(H \leq G\), Ruby wins \(H - G\) moving second. This means that Ruby has a winning response to any of Lazuli’s moves in \(H - G\). Since \(H - X\) is one such option, Ruby has a winning response and wins \(G - G'\).
- Now, suppose Ruby moved \(G' \to H^{L}\). (In this case we need to show that Lazuli wins.) Since we know that \(H \leq G\), \(G \geq H\), meaning that Lazuli wins \(G - H\) playing second. Therefore, any of Ruby’s options in \(G - H\) have a winning response by Lazuli. Since \(G - H^{L}\) is one such option, Lazuli has a winning response and wins.
Here’s a tree, originally from Siegel, marked up in color by me, that might help:
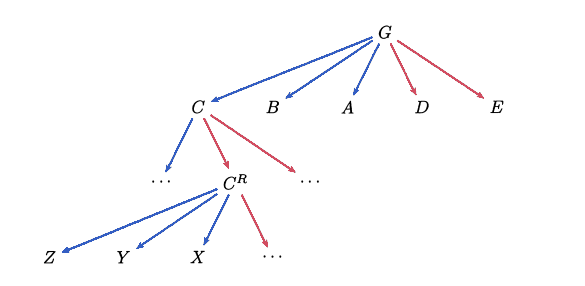
If \(C^R \leq G\), then if Lazuli moves to \(C\), Ruby can undo any progress that move gave Lazuli by moving to \(C^R\). So, whatever properties that \(C\) has are irrelevant, as moving to \(C\) will just force a move back to \(C^R\). What bypassing reversible moves allows us to do is cut out the middleman (\(C\)) and just replace it with whatever Lazuli’s options are after the inevitable move happens, which in this case are \(X\) and \(Y\), leaving the position as
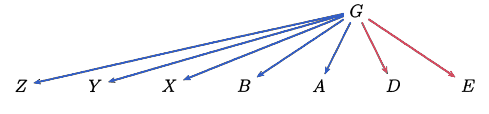
This potential addition of new options makes it seem like the position got more complicated, but in reality what happened is that we “skipped” a level in the tree, which makes the entire position simpler. In fact, combining this with the removal of dominated options allows you to get a single simplest form for any position! The proof of this fact isn’t very illuminating, so I skip it, but the assidious reader can verify it for themself.
Note that if the new position is equal to the old, all those new options are duplicates, so the simplified position just has the reversible move omitted.
What this bypassing allows us to do in the case of nimbers is find the value of positions like \(\impgame{0, \star, \star2, \star4, \star30}\). In this particular position, if either player moves to \(\star4\) or \(\star30\), the other player can reverse it using the interesting move of going to \(\star3\). Moving to either \(\star4\) or \(\star30\) is much like the Poker-Nim game I outlined above. All it does is buy time.
But what’s the magic of \(\star3\)? The crux is looking at the list of nimber indices represented in each player’s options: \(0\), \(1\), \(2\), \(4\), \(30\). \(3\) is missing, and importantly it is the first value missing. Every nimber beyond \(\star3\) can simply be reversed by going to \(\star3\), with no extra options granted when you bypass the reversible move.
The name for this property is that \(3\) is what is called the minimum excludant (commonly shortened to just mex) of the set \(\{0, 1, 2, 4, 30\}\), and this gives us the Mex Rule:
If we have a position \(\impgame{\star a, \star b, \star c, \cdots}\), then it is equal to \(\star x\), where \(x = \operatorname{mex}(\{a,b,c,\cdots\})\).
This Mex rule allows us to quickly and elegantly get a powerful result in combinatorial game theory:
The Sprague-Grundy Theorem
If you are a fellow UMD student who knows me, you will have incessantly heard me making jokes about this theorem. What follows is an example of one such joke:

At long last, I will explain myself. The Sprague-Grundy Theorem allows us to show a very powerful fact:
Every impartial position is equal to \(\star n\) for some \(n\).
This means that not only is every impartial game equivalent to Nim, every position therein is equivalent to a single Nim heap!
Why is this true?
Let’s think about how impartial games end, and work our way back up. The only possible position that an impartial game can end at is \(0 = \star0\), since if one player has no options the other must not have any either (since every sub-position of an impartial position is also impartial). If you recall how I represented a position using a tree when talking about reversible moves, we can think of these \(0\)’s as the bottom level. We can then go up a level, and use the Mex rule to show that this level is some \(\star n\). And then we can go another level up and show that this, too, is some \(\star n\). We can keep doing this until we reach the top, to show that whatever impartial position we can come up with is some nimber.
The formal proof of this fact is basically identical to that explanation with a bit more mathematical language and a bit less handwaving, but here it is for completeness:
The Sprague-Grundy Theorem: Every impartial position is equal to \(\star n\) for some \(n\).
Proof:
By Induction.
Base Case: \(0 = \star0\)
Inductive Case: Consider an impartial position \(G = \impgame{A, B, C, \cdots}\) and suppose all options are equal to nimbers. Thus, by the Mex Rule, so is \(G\).
\(\blacksquare\)Incredible! All of that babbling about Nim and nimbers was actually incredibly valuable. With the knowledge of this theorem, the Mex Rule, and some practice adding nimbers, you can become unbeatable at many simple games (and, with even more knowledge from later parts, you can become a master of All Green Hackenbush, too). What you choose to do with such an ability is left as exercise.
By the way: you will encounter nimbers in multitudes throughout this series from now on. They aren’t going away.
There’s one peculiar property of nimbers that we haven’t gone into too much detail about, though, that they’re in between all positive numbers and all negative numbers. This property isn’t unique to nimbers, and there are a whole host of positions lying really, really close to zero. We’ll get to that in Part 6.
Summary of Part 5
- A nimber \(\star n\) is a position constructed by allowing both players the option of moving to all previous nimbers, \(\impgame{\star 0, \star 1, \cdots, \star(n-1)}\).
- \(\star0 = 0\), and \(\star1 = \star\)
- All nimbers are confused with zero and each other.
- To add two (finite) nimbers, take the bitwise exclusive or of their indices.
- A move is reversible if the opponent can immediately revert it to a position that is at least as good for them as the original was.
- Reversible moves can by bypassed by replacing them with all options of the position after the “undo button” was pressed without changing the value of the position.
- If you have a position like \(\impgame{\star a, \star b, \star c, \cdots}\), the value of the position is \(\star x\), where \(x = \operatorname{mex}(a,b,c,\cdots)\), the smallest number not in the set, by the Mex Rule.
- Every impartial position is equal to some nimber.
In Part 6, we will
- Examine some infinitely small positions and compare them with each other.
- Encounter some pretty Hackenbush flowers.
- Learn a new way of combining two positions.
- Discover the Lawnmower Theorem.